Showing posts with label Photoshop. Show all posts
Showing posts with label Photoshop. Show all posts
Thursday, January 22, 2015

Saturday, September 21, 2013
Q. Designs Tutorial Day 3!

Day 3 of the rendering tutorial is finally here! Sorry for the wait for those that are following along but I've been really busy. I hope you all enjoy what I'm teaching in this one. Feel free to email me with any questions!
Thursday, June 20, 2013
The Collection - Asics Gel Lyte III


Check out the collection! This is something new where I will take an existing shoe model and explore different colorways by only changing levels and curves in Photoshop. Stay tuned for the next series! I'll be using the New Balance 998. Which is your favorite?
Thursday, June 13, 2013
Q. Designs Tutorial Day 2!
What's up world! I've uploaded Day 2 of the Q. Designs rendering tutorial for those who have been following along so far. In this video, I'm walking you through how to begin constructing your upper design. Day 3 we will cover details such as stitching and airbrushing! Hope you are learning something now!
Tuesday, May 21, 2013


Friday, May 17, 2013
Monday, April 22, 2013
Q. Designs NO. 2

Hello world! Check out my latest creation...the NO.2. The upper is made of brown, pull-up leather, performance mesh, and hints of high frequency. What do you think?
Be sure to like my fan page on Facebook for constant new designs and motivational posters! Click the link below to find me!
Monday, March 4, 2013
Power Force Runner X: More Views


More of the Power Force Runner X. Can't wait to get this one sampled!
Wednesday, February 13, 2013
Q. Designs Tutorial Day 4: Upper Construction


I'm back! I know it's been a minute since the last tutorial, but I've been a bit busy lately! I appreciate those who have emailed or tweeted about the first few days of tutorials. I'm glad that it is reaching those of interest.
So let's get in to it! We will be constructing the upper today. The first step you want to take is outline the mid section with your pen tool. Make sure that you are under your Upper group when doing this. Once it is outlined, you want to fill it with your color of choice.


Next step is to give that mid section some 3-dimensional effects by using your Bevel and Emboss tool. I usually use the settings you see on image one for upper materials such as suedes, leathers, nubucks, and synthetics.
After that is completed, because I want this piece as a synthetic material, you want to add Noise to it to give it the look of some type of grain. You do this by clicking Filter > Noise > Add Noise > Adjust your percentage and Press OK.
Tip: You can adjust your distribution to Uniform or Gaussian depending on what you think looks the best. These options rearrange the pixels differently.


Next you want to make a new layer underneath the Mid section and draw path to create the vamp of the shoe. I filled this path with black because I want this section to be patent leather.
Next draw a path to outline the area where the mesh will be located.


Now we will add a mesh texture to the area that we want. You do this by Googling mesh fabric and finding one you find suitable for the look you want. Download and save this image and then open it in Photoshop.
Depending on which mesh you have chosen, you can change the color or brightness of the mesh by using Hue/Saturation. The mesh I choose is a bit too light for me so I simply darkened it by clicking Image > Adjustments > Hue/Saturation...
Tip: When adjusting the Hue/Saturation of grays or blacks you want to drop your Saturation down to 0 and from there adjust the Lightness level.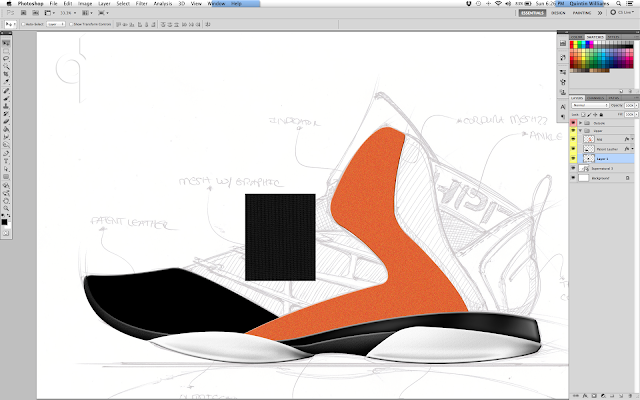


Once you have your mesh perfect, you copy and paste that image into your sneaker rendering. Be sure that it's on its own layer. Once it is place, if the perforations of the mesh aren't true to size you will have to make it bigger.
You do this by keying Command + T, which is your Transform tool. Now you hold Shift and click and drag a corner to make bigger or smaller, then press Enter.
If your mesh's perforation are now true to size but still doesn't stretch across your area completely, you want to duplicate that layer and move the mesh across so that it looks seamless.
To duplicate a layer you simply key Command + J. This creates a layer copy above the existing layer. Once the mesh looks seamless, you want to merge all of the duplicated layers into one. Key Command + E and name the layer Mesh.


The next step is to use our Vector Mask Tool to have our mesh constrained to the path we outlined for it. You do this by making your mesh path "march", then go to the bottom of the layer tab and click Add vector mask. This will give you a clean, outlined mesh area as pictured above.
Get used to this tool, because you will be using this a lot to whenever you want to add real images of textures or materials.
Tip: Remember to save your work! After completing any major steps of your rendering you want to save because it would suck to lose all of that hard work!


We will continue to use all of the same procedures to complete the upper now. Remember the Vector Mask Tool will be your best friend when placing real materials/fabrics into Photoshop.
Once you get all of the sections filled with either color or material, you have the basis of the upper completed! We will stop here for today. Day 5 we will be tackling the detailing of the upper. These are the things that will start giving the upper a realistic look. Are you excited to see the final product? I know I am! See you on Day 5!
Subscribe to:
Posts (Atom)